CS 10B Programming Concepts and Methodologies 1
Lesson 5: Loops 2
Section 5.1: do-while Loops
Have you noticed that since we have been talking about loops only one new construct has been introduced? We first introduced the while loop, and then showed how a while loop is used to write three different types of loops: question- type, special-value-type, and counter-controlled. In this section we introduce a second loop construct. With this new loop construct you will be able to write question-type loops and special-value type loops with a new twist.
In all of the question-type and special-value-type loops we have discussed thus far, we have been careful to allow the user the option of not executing the loop even once. Sometimes this is not desirable: there are times when we would like to assume that the user will execute the loop at least once. C++ provides a special loop construct called a do-while loop to handle this situation. The only difference between a while loop and a do-while loop is that in a while loop the condition is checked at the top of the loop, whereas in a do-while loop the condition is checked at the bottom of the loop. The result of this is that the do-while loop is always executed at least once, because C++ doesn't check the condition until execution reaches the bottom of the loop.
The general form of the do-while loop is:
    do {
        <statements>
    } while (<condition>);
Notice that the primary difference in appearance between this and the while loop is that the while (<condition>) part now comes at the bottom instead of at the top.
When you are writing a program and you come to a point where you know need a loop, you will have to decide whether to use a while loop or a do-while loop. In general, the principle is
Use a do-while loop if you know that the user will want to execute the loop at least once.
Use a while loop if you aren't sure.
However, it is also true that the while loop is used far more often than the do-while loop. My recommendation is that you always start off using a while loop. You can switch to a do-while loop if you finish your program and decide that you could clean up your code a bit by using a do-while.
Example 1: Question-type loops
Let's go back to (you guessed it) our paycheck problem. Let's rewrite it using a question-type loop, but this time assuming that the user wants to execute the loop at least once:
    #include <iostream>
    using namespace std;

    int main() {
        int hours;
        int paycheck;
        char response;
        int payRate;

        do{
            cout << "enter hours worked: ";
            cin >> hours;
            cout << "enter rate of pay: ";
            cin >> payRate;
            paycheck = hours * payRate;

            cout << "the amount of the paycheck is " << paycheck
                 << " dollars." << endl;

            cout<< "Is there another employee to process (Y/N)? ";
            cin >> response;
        } while (response == 'Y');
    }
    enter hours worked: 10
    enter rate of pay: 15
    the amount of the paycheck is 150 dollars.
    Is there another employee to process (Y/N)? Y
    enter hours worked: 29
    enter rate of pay: 10
    the amount of the paycheck is 290 dollars.
    Is there another employee to process (Y/N)? N
Example 2: Special-value-type loops
Now let's write the same program, again assuming that the user will execute the loop at least once, but this time let's use a special-value type loop.
    #include <iostream>
    using namespace std;

    int main() {
        int hours;
        int paycheck;
        int payRate;

        cout << "enter hours worked: ";
        cin >> hours;
        do{
            cout << "enter rate of pay: ";
            cin >> payRate;
            paycheck = hours * payRate;

            cout << "the amount of the paycheck is " << paycheck
                 << " dollars." << endl;

            cout<< "enter hours worked (-1 to quit): ";
            cin >> hours;
        } while (hours != -1);
    }
    enter hours worked: 10
    enter rate of pay: 15
    the amount of the paycheck is 150 dollars.
    enter hours worked (-1 to quit): 29
    enter rate of pay: 10
    the amount of the paycheck is 290 dollars.
    enter hours worked (-1 to quit): -1
Notice that when this program is run the option of entering -1 is not given to the user the first time.
Section 5.2: for Loops
Before we jump into our next topic, a quick review. We've talked about quite a few different types of loops now: question type loops, special-value type loops, counter controlled loops, while loops, and do-while loops. Let's get a few things straight about them before we move on.
First of all, question type loops and special-value type loops are not actually C++ constructs. They are helpful ways for students to categorize loops while learning to program. You can think of them as loop patterns. While loops and do-while loops, on the other hand, are actual C++ constructs. We might use a while loop to implement any of the three loops patterns, or we might use a do-while loop to implement any of them. The following tables organize loops into their appropriate categories:
| Loop Patterns |
| question type |
| special-value type |
| counter controlled |
| C++ Loop Constructs |
| while loop |
| do-while loop |
We will discuss one more type of C++ construct, called a for loop. For loops are designed specifically for use with counter controlled loops. In fact, from now on, whenever you write a counter controlled loop you should use a for loop, and you should never use a for loop except when writing a counter controlled loop. In other words: you should use a for loop exactly when it can be determined before the loop begins executing how many times the loop will execute.
Here's what a counter controlled loop looked like when we used a while loop to implement it:
    int count = 0;
    while (count < N){
        <body>
        count++;
    }
Here's how we would use a for loop to implement the exact same counter controlled loop:
    for (int count = 0; count < N; count++){
        <body>
    }
See what's going on here? With a counter controlled loop there are several bookkeeping things going on. There is an initialization somewhere before the loop (count = 0), there is a test for continuation (count < N), and there is an increment (count++). All we are really doing with a for loop is putting these three elements all in one place together at the top of the loop. This is a great convenience both for the writer and the reader of a counter controlled loop. The reader no longer has to look all over the place to understand the basic characteristics of a loop. She just looks right at the top and all of the information is right there.
Here are the details of the for loop. Notice that in the for loop header there are three elements separated by semi-colons. The first element is an initialization statement. It gets executed exactly once (not each time through the loop!), BEFORE execution of the loop begins. The second element is a condition. This condition is checked each time prior to executing the loop to make sure that it is still true. Once the condition becomes false, the for loop is exited. The third element is an increment statement. This is very important: the increment statement is executed at the end of each time through the loop, as if it were the final statement in the loop body. This explains why I have been insistent about putting the increment statement at the bottom of each counter controlled loop example we have done.
Think of the for loop given above as a template that you should fill in. You can pretty much assume for now that it will always look exactly like this except that in the place of N you put the expression that represents how many times the loop should be executed. You will also fill in the body of the loop, of course. The only other things that might possibly change are (1) you might come across a situation where you would want to start counting at a number other than 0. In that case, you would simply replace the 0 with the appropriate number; (2) if you find that you want to count by 2s or 3s, for example, the increment statement might change to count = count + 2 or count = count + 3. But I wouldn't expect to see any situations like this any time soon. You will save yourself grief if you try to stick to the basic template as much as you can.
Having said that, I need to let you know that it is possible (but bad programming practice) to get really crazy with your for loops. I'm only telling you this so that you will recognize these things if you see them in someone else's code. You shouldn't adopt any of these ideas for your own code.
You can put more than one statement (as many as you want!) in the initialization spot or the increment spot. You do this by separating the statements with commas. This means that theoretically you could put your entire program that precedes the for loop inside the for loop header! Just separate the statements with commas instead of semi-colons. Additionally, you could always put the entire body of your for loop inside the for loop header where the increment statement is supposed to go. C++ can't tell the difference. It just knows to execute all of the statements that come before the first semi-colon once before beginning to execute the loop, and to execute all of the statements that come after the second semi-colon each time through loop.
You could also implement a special-value type loop using a for loop. The main difference would be that the condition would not have a counter in it. It might look something like this:
    int count;
    cout << "Enter a number: ";
    cin >> number;
    for (count = 0; number != -1; count++){
        cout << "Enter a number: ";
        cin >> number;
    }
    cout << "you entered " << count << " numbers" << endl;
The unusual thing about this for loop is that the condition does not involve "count". Although you may see some programmers using for loops in this manner, you should continue to implement your non-counter controlled loops using while.
Section 5.3: for Loop Examples
Following are several examples of for loops. They are simply the counter controlled examples we did in Lesson 4 using while loops converted into for loops. I suggest that you study each one, comparing it to the corresponding example from Lesson 4 to make sure that you understand how this conversion takes place. From now on in your programming exercises you should always use a for loop when implementing a counter controlled loop.
Example 0:
    #include <iostream>
    using namespace std;

    int main() {
        for (int count = 0; count < 10; count++){
            cout << "Dave" << endl;
        }
    }
    Dave
    Dave
    Dave
    Dave
    Dave
    Dave
    Dave
    Dave
    Dave
    Dave
Example 1:
    #include <iostream>
    using namespace std;

    int main() {
        int numTimes;

        cout << "Enter number of times you want the name written: ";
        cin >> numTimes;

        for (int count = 0; count < numTimes; count++){
            cout << "Dave" << endl;
        }
    }
    Enter number of times you want the name written:  7
    Dave
    Dave
    Dave
    Dave
    Dave
    Dave
    Dave
Example 2:
    #include <iostream>
    using namespace std;

    int main() {
        int maxNumber;

        cout << "Enter number you want to count up to: ";
        cin >> maxNumber;

        for (int count = 0; count < maxNumber; count++){
            cout << count +1 << endl;
        }
    }
    Enter number you want to count up to:  9
    1
    2
    3
    4
    5
    6
    7
    8
    9
Example 3:
    #include <iostream>
    using namespace std;

    int main() {
        int maxNumber;
        int sumSoFar;

        cout << "Enter number you want to add up to: ";
        cin >> maxNumber;

        sumSoFar = 0;
        for (int count = 0; count < maxNumber; count++){
            sumSoFar = sumSoFar + (count + 1);
        }
        cout << "The sum of the numbers from 1 to " << maxNumber
             << " is " << sumSoFar;
    }
    Enter number you want to add up to:  100
    The sum of the numbers from 1 to 100 is 5050.
Section 5.4: Nested Loops
Just as it was possible to have nested if statements, it is also possible (and common!) to have nested loops. Nested loops, however, tend to be conceptually much more difficult to handle. Let me make a few suggestions about how to approach nested loops, and then we'll do an example.
First, a common error that novice programmers make is using nested loops where none is necessary. Don't use nested loops unless you specifically see a reason to.
The best way to think about nested loops is to never think about both the inner loop and the outer loop at the same time. When you are deciding whether to put a second loop inside of your first (outer) loop, you should ask yourself the question, "what should be happening each time throught this outer loop? Is this sub-task something that requires a loop, or can it be implemented without a loop?" If the answer is that the sub-task itself needs to be implemented using a loop, then it is necessary to use nested loops.
Example:
Let's write a program that will produce the following output:
    0
    0 1
    0 1 2
    0 1 2 3
We should keep in mind as we are writing this program that we want our program to be flexible. For this reason, we will include a constant to indicate how many rows we want in the output:
const int NUM_ROWS = 4;
Then we can easily change this constant to get output with any number of rows.
First we notice that we are going to need a loop to accompish this task. Each time through our loop will print one row of the output. What kind of loop should we use? Since we know how many times the loop will be executed, we should use a counter controlled loop, which means using a for loop.
So we can start our program like this:
    #include <iostream>
    using namespace std;

    const int NUM_ROWS = 4;

    int main() {
        for (int rowCount = 0; rowCount < NUM_ROWS; rowCount++){
            <insert code to print out a single row>
        }
    }
Now we have to think about how we are going to implement the code to print a single row. Since the lengths of the rows depend on factors such as NUM_ROWS and which row we are on, we won't be able to write the code to print a single row without using a loop. The code for printing one row will look like this:
        for (int columnCount = 0; columnCount < ???; columnCount++){
            cout << columnCount << " ";
        }
        cout << endl;
This is simply a for loop which starts counting at 0 and gets executed ??? times. So the question is, How many times do we want this inner loop to execute? Well, when the row is 0, we want the inner loop to execute 1 time. When the row is 1 we want the inner loop to execute 2 times, when the row is 2 we want the inner loop to execute 3 times, and so on. So (in summary) we want the inner loop to execute "rowCount + 1" times. So I'll now insert the code to print out a single row into our program, replacing the ??? with the expression "rowCount + 1". I'll also abbreviate column with "col", a standard convention.
    #include <iostream>
    using namespace std;

    const int NUM_ROWS = 4;

    int main() {
        for (int rowCount = 0; rowCount < NUM_ROWS; rowCount++){
            for (int colCount = 0; colCount < rowCount + 1; colCount++){
                cout << colCount << " ";
            }
            cout << endl;
        }
    }
Section 5.5: Files
Section 5.5.1: Creating the Input File
Preliminary Note: The hardest part about working with files has nothing to do with C++. It's making sure that the input file is located in the correct place on your file system. Here's the information you'll need:
Hints about reading input files:
Using JDoodle:
Input files can be uploaded to JDoodle by selecting the "Upload input files" icon that is located near the top in the right side of the project window. This will open the Upload input files window and you can either browse and select the file from your computer or drag and drop the file.
When the program is executed and asks for the name of the input file, the entire file-path and extension for the file must be entered. For example: /uploads/filename.txt
Using Visual Studio:
- right-click on the "Source Files" folder in the Solution Explorer and choose "Add" then "New Item".
- Then in the "Add New Item" window, navigate to "Utility" and select "Text File (.txt)". This adds a text file to the "Source Files" folder in the Solution Explorer.
- copy the data from the webpage where it is provided and paste it into this file.
Using Xcode:
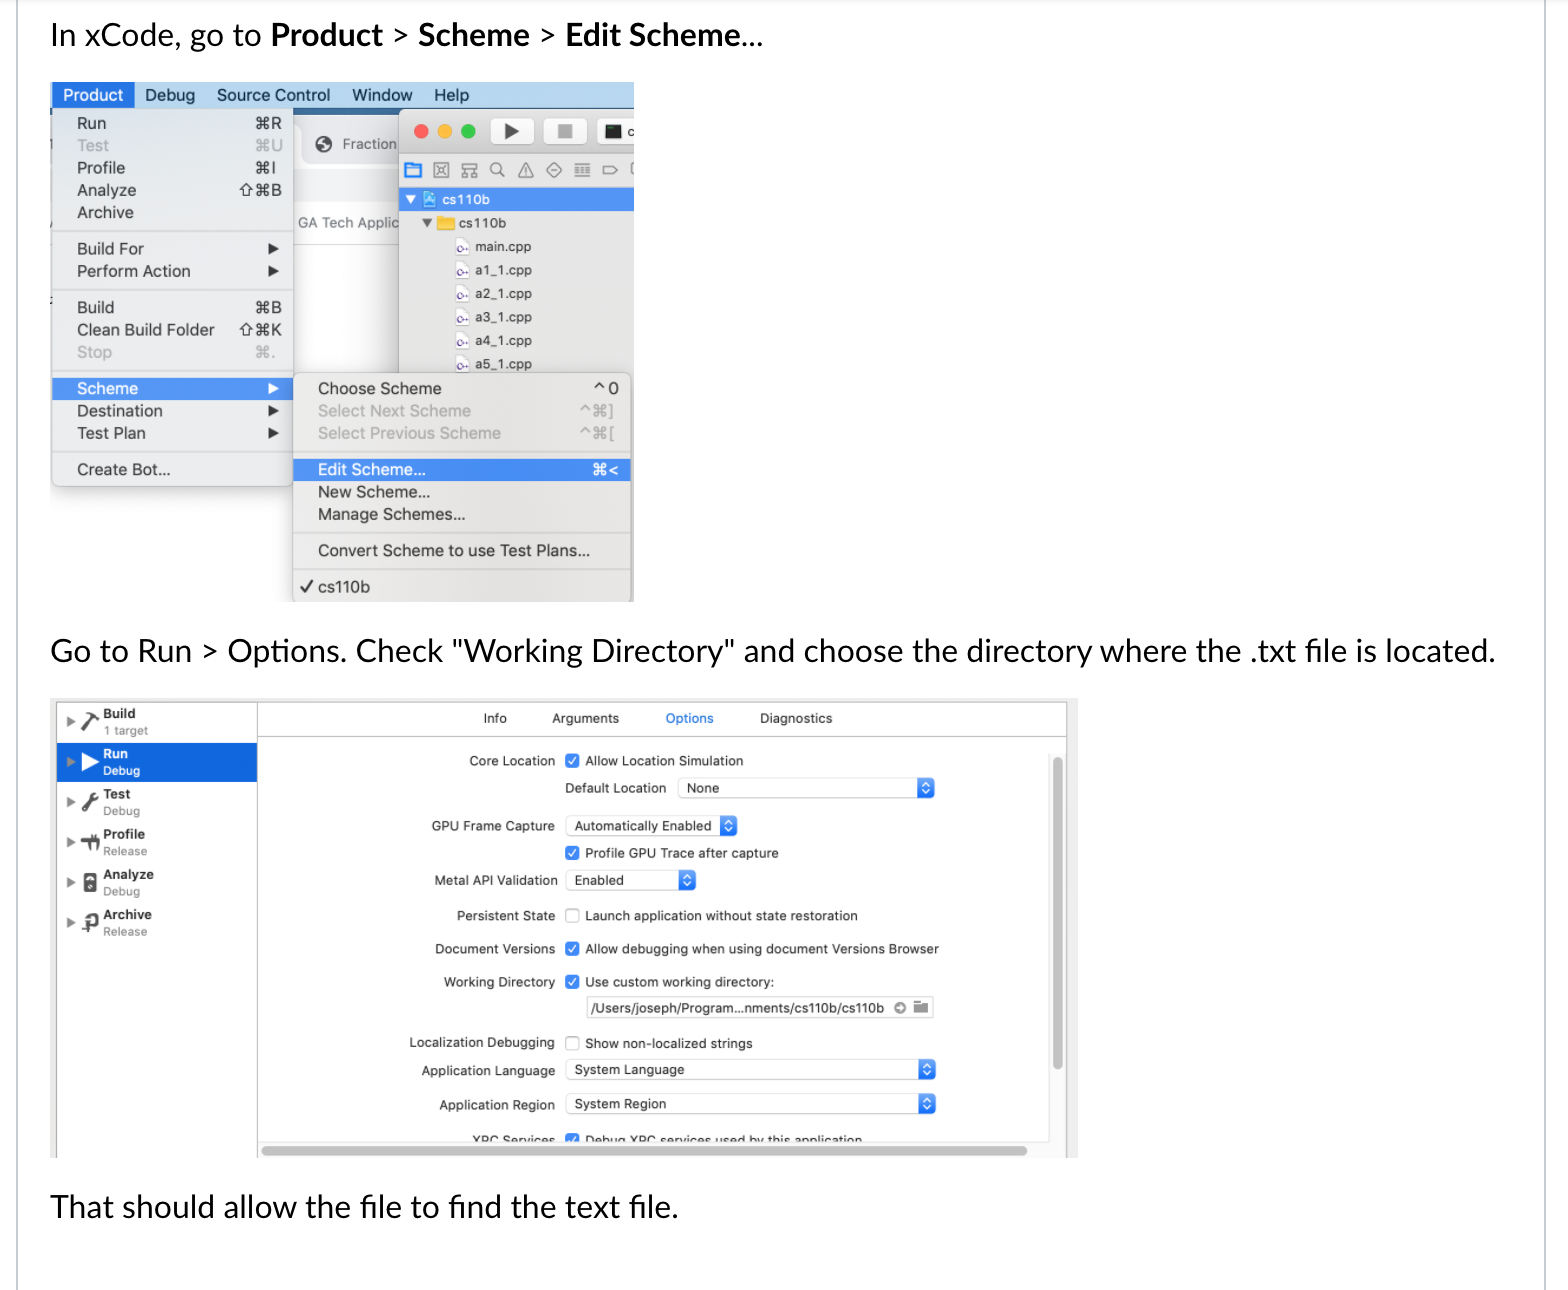
About File Names
Extensions are part of the file name. If you want to count the words in a file named "myfile.txt", typing "myfile" or "myfile.cpp" won't work.
On many systems, the default is to not show the extension on file names. I strongly suggest that you change this setting, so that extensions are shown.
Section 5.5.2: Processing the Input File
There are 6 steps to follow when you want to read from or write to a file in your program. I have included explanations of those 6 steps as comments in the example below.
// step 1: add "#include <fstream>" to the top of your file

#include <iostream>
#include <fstream>
using namespace std;

int main() {
    // step 2: declare an input stream variable.  I've named it "infile" but you can make up your
    // own name.  We call this a stream variable in C++, but it may be easier to think of it as a
    // "file variable" since it represents a file.

    // Once you've declared a stream variable, you will use that variable (e.g., "infile") in your
    // program to refer to the file, instead of using the actual name of the file.

    ifstream infile;
    char ch;

    // step 3: open the file, which means
            // a) get it ready for reading
            // b) associate the stream variable with a physical file
    infile.open("data.txt");

    // OR, use the following code to let the user enter the name of the file:

    /*
    string filename;
    cout << "Enter the name of the file: ";
    cin >> filename;
    infile.open(filename);
    */

    // Note: you must create the text file yourself.  You could use your IDE's
    // text editor to create it, or you could use Notepad (Windows) or TextEdit
    // (Mac) to make it, or you could use a word processor and chose "save as
    // text" when you save it.  I strongly recommend that you simply use your IDE's
    // text editor.  If you use a word processor or Mac's TextEdit, you must be
    // careful that your file is saved as a plain text file.  Accidentally saving the file in
    // some other format (.docx, .rtf, etc.) is a major source of headaches for
    // students, and just making sure the extension is .txt does not guarantee that
    // the file is a plain text file.

    // step 4: check to make sure the file opened successfully.  See step 5 below for an
    // explanation of why we use "infile" as a logical expression.

    if (!infile){
        cout << "couldn't open file." << endl;
    } else {

    // step 5: use a special-value type loop to read through the file.  Here I illustrate
    // reading one character at a time; In your assignment it's likely that you'll want to
    // read one string at a time instead.  It may seem a little strange to see "infile" being
    // used where you would expect to see a logical expression.  It turns out that stream
    // variables can be used in the place of a logical expression.  When they are, they have
    // the value "true" when everything is fine.  The value "false" indicates that the stream
    // variable has gone into an error state.  One thing that causes a stream variable to go into
    // an error state is when you try to open a file that can't be found (see step 4 above).  In
    // our current step, the stream variable goes into an error state when an attempt is made to
    // read past the end of the file.  This works out nicely for us, because that is precisely when
    // we want our loop to stop.

        infile.get(ch);
        while (infile){
            cout << ch;
            infile.get(ch);
        }

    // I can't emphasize enough how important it is to use a special-value loop in this case.  other
    // types of loops will often result in reading the last character in the file twice.

    // step 6. close the file

        infile.close();
    }
}
To read (and process) one string at a time instead of one character at a time, simply replace the code in step 5 above with the following:
    infile >> astring;
    while (infile){
        <process astring>
        infile >> astring;
    }
If you are writing a program to process a file one string at a time, your code will look a lot like this. Just replace <process astring> with whatever it is you want to do each time you read a string. For example, if you are counting words in a file, processing each string would mean incrementing a counter.
If you find that your program cannot open the input file successfully, it is almost certain that you have saved your input file in the wrong place. If you have this problem and can't get it straightened out, don't waste hours on it. Review the first paragraph of this section (lesson 5.5). If that doesn't help, ask for help!
Here is an example that makes a copy of a file.
#include <iostream>
#include <fstream>
using namespace std;

int main() {
    ifstream infile("data");
    if (!infile) {
        cout << "couldn't open file." << endl;
    } else {
        ofstream outfile("newfile");

        char ch;

        infile.get(ch);
        while (infile) {
            outfile << ch;
            infile.get(ch);
        }

        infile.close();
        outfile.close();
    }
}
Here is an example that counts the number of times the ">=" operator occurs in a file.
#include <iostream>
#include <fstream>
using namespace std;

int main() {
    char prevchar;
    char currchar;
    int count = 0;

    ifstream infile("data");
    if (!infile) {
        cout << "couldn't open file." << endl;
    } else {

        infile.get(prevchar);
        infile.get(currchar);
        while (infile) {
            if (prevchar == '>' && currchar == '=') {
                count++;
            }

            prevchar = currchar;
            infile.get(currchar);
        }

        infile.close();
        cout << "It occured " << count << " times." << endl;
    }
}
Processing Multiple Files
Here is an example that does the same thing again, but allows the user to enter multiple files to be processed.
#include <iostream>
#include <fstream>
#include <string>
using namespace std;

int main() {
    char prevchar;
    char currchar;
    int count;
    string filename;
    ifstream infile;

    cout << "Enter the name of a file (or \"quit\"): ";
    cin >> filename;

    while (filename != "quit") {

        infile.open(filename);
        // infile.open(filename.c_str());  This syntax required in older (before 2011) C++ standards.
        if (!infile) {
            cout << "couldn't open file." << endl;
        } else {
            count = 0;
            infile.get(prevchar);
            infile.get(currchar);
            while (infile) {
                if (prevchar == '>' && currchar == '=') {
                  count++;
                }

                prevchar = currchar;
                infile.get(currchar);
            }
            cout << "It occured " << count << " times." << endl;
        }

        infile.clear();
        infile.close();

        cout << "Enter the name of a file (or \"quit\"): ";
        cin >> filename;
    }
}